Sunday 26 June 2016

Christmas Card Club - Cute card

This fortnight, Sylvie at Gibmiss has chosen the theme of a cute Christmas card.

Right away I knew the card I wanted to make. Many of you may remember that my grandkids used to love coming over to make cards. Their favourite part was to colour their cards. They would concentrate so hard to stay in the lines and that was no easy feat for for they started making cards when they were just 3.
This adorable little reindeer image was colored with copic pens. It was finished a couple of years ago by Little Miss C. She used to love to colour and to make cards...but now she is 9 and her life is busy with horses and sports and of course with her friends. It is a rare moment now when she has time to make cards!

I thought I would surprise her and make up a card with this image. She had carefully carried up all her finished images and craft supplies to my house and told me to use them...she was making  space in her room for her new pursuits.


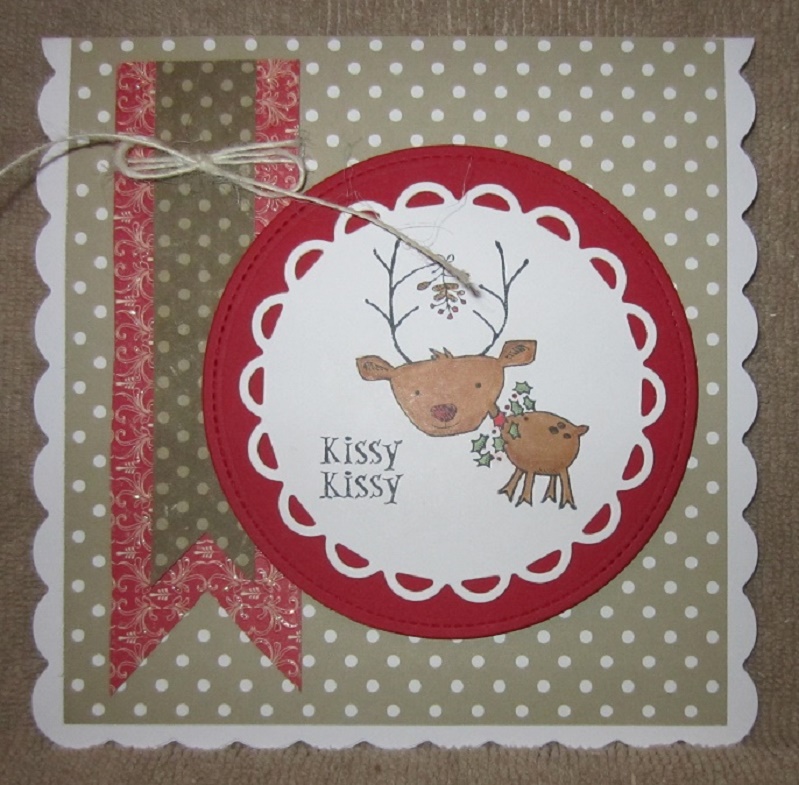
The image was already stamped onto a Spellbinders Lacey Circles. I matted that with a Lawn Fawn stitched circle diecut made with a snippet of red card. I kept the design for this card quite simple.I wanted her sweet image to take center stage. I added a little clear wink of Stella  to the ivy wreath and also to Rudolph's red nose.

The dotted background DP is an unknown 12x12 scrapbook paper that has been cut down into four 6 inch squares. I trimmed it down a wee bit further and placed it on a 6 inch square scalloped card.

Still had my snippets box of Xmas DP out on my desk and just paired two snippets to make a double layered fish tale banner. The XXXX red patterned DP is heavily embossed and glittered. The brownish/green dotty one is unknown. Before I glued it down, I wrapped a bit of fine white jute twin around it a couple of times and tied it into a bow. Pop dotted the matted image and  finished up this sweet card in under 15 minutes!

i am entering this card in the following challenges:

1. Christmas Card Club - cute Christmas card
2. Crafty Hazelnuts Christmas Challenge - Use a sentiment and must be Christmas
3. Polkadoodles - use a die cut Spellbinders Lacey Circles and Lawn Fawn stitched circles cut with my Big Shot
4. Crimbo Crackers - Anything Goes
5. A Snowflake Promise - Anything goes Challenge 24
6. Simon Says Stamp Wednesday Challenge - Add some Shimmer
7. Stamping Sensations - Feature A Creature
8. Crafty Hazelnuts Patterned Paper Challenge - must use patterned paper

Saturday 25 June 2016

June Rudolph Days Challenge

Time for the June Rudolph Days Challenge. You have until midnight PST June 30th, to enter your Christmas card or Christmas project.

Here is a quick review of the rules for your perusal.

1. The Rudolph Days Challenge will start each month on the 25th, and will close at midnight PST, on the last day of that month.
2. The theme is always Anything Goes, as long as it is Christmas.
3. One entry per person and you just need to enter one Christmas card or Christmas project.
4. You may combine your entry with other challenges (maximum of 10 in total).
5. Your card (or Christmas project) should not have been previously posted to your blog. It should be posted to your blog during the current months Rudolph Days Challenge, (between the 25th and last day of the current month)
6. Please link back to or at least mention, the Rudolph Days Challenge.
7.  Prizes will be shipped anywhere in the world.
8. The winner will be selected by random draw and announced on the first day of the following month.

As always, we have some wonderful inspiration from our design team.

Valerija of Moje Veselji has mad this beautiful Christmas Candle card. I am loving all that silver glittery background and the pretty dies she used here. The white square intricate die looks wonderful against the red card background.


Liz of  Crafty Sunflower  has made this striking red and white reindeer card. Amazing how the white  makes such a pop against the red embossed background! That reindeer is getting ready for takeoff...could it be Rudolph?


Eemeli of Eemeli's Home as this adorable snowman. I think the blue colour scheme is so soft and pretty! I especially love the wee pop of red in the bottom DP...


Kath at Handmade by Kathleen  has made this stunning Christmas Tree greetings card. How I love that die! It has tons of sparkle as it is cut from red glitter paper.


My card is quite simple. I used a Penny Black Stickeroo, matted twice with red card.
I off-centered that onto a piece of Echo Park Chillingsworth Manor 12x12 scrapbook paper which a cut down into 6 inch squares. I quite like this paper as it has a kind of dirty brownish edge on two side, which looks like it was ink distressed. 
I had a fairly slender snippet of greenish/brown dotted DP. Sorry I do not remember the manufacturer anymore. I used that as a sort of grounding strip to anchor two layers of Memory Box Fir borders. The front layer is just green card but the back layer is distressed silver metallic card. The green was very similar to the background and blended in too much, so I gave it a random coat of Wink of Stella white and  I missed some areas on purpose, so you could still see part of the green card.


I am entering my card in the following challenges.
1.Pixies Crafty Workshop - must use snippets

This month, the Rudolph Days Challenge prize is a choice of this Memory Box Holly leaf border...
or a surprise stamp set. It has to be a surprize because I forgot to write the name down before I left to visit my Mum...silly me.  I have some great Christmas stamp prizes so will let the winner pick from my prize stash!


Saturday 11 June 2016

Christmas Card Club - Star of Wonder

This fortnight was Zoe's turn to chose the theme for our Christmas Card Club. She chose Star of Wonder. I think this is such a great theme. To see the other submissions from my fellow CCC members, you can click on any of their names on my right sidebar. If you are interested in joining a fun club with a lovely group of ladies, let me know.

Today's card started off as a rusty orange prefolded square card that was not too bad of a weight.  As soon as I spied the rich colour, I decided to make another glittered hill Nativity Card.  I really was not happy with the one I created on this post here and decided to try to improve on that design..

I really liked the idea of musical note DP last time, and luckily had a snippet of an orangy coloured 12x12 DP left over from a scrapbook page. It was almost large enough to make the background mat for this card.. I managed to cover up the shortfall by placing one  American Crafts Marquee Glittered Love diecut hill over the bottom of it. I cut a second hill out of kraft and promptly used it to shadow the glittered hill.

Stamped the image onto white Copic paper and used Stampin' Up chalks to create the sky and the sand dunes.  Using the base card colour to inspire me, I used Twinkling H2O's to colour the village and the large palm tree . I used the stardust stickles on the stars but used a fine tipped steel to place the stickles dots. No blobby bits this time!


I  used many different colours of ink to stamp this image and then huffed on the stamp before laying it on the paper. I used Black for the Wise Men and North star, beige for the teensy stars, and brown for the hills and village. I even coloured the tree trunk brown and the leaves in green. Have not used the huff technique for many years so it took a couple tries to get it right.

Matted the image and sentiment with kraft. added a blingy star and called it done. I like this one so much more than the  one I created the other day.

This was such a hard photo to take. The glare off the glittered card was so strong...it seems to make the three wise men look so pale. IRL they show as black ink...not faded looking like they show here!

Recipe
Prefolded 5 1/2 inch orange card and envelope
DP - from my 12x12 scrapbooking snippets box
Glitter paper - Heidi /swap American crafts Marquee Love gold glitter paper
Card stock - snippets of kraft card
Stamp Sentiment - Hobby Arts Wise Men
Stamp image-  Stampendous Travelling Far
Ink - Ingrid Bolme chalk ink
Colouring - H2O's and Stampin' Up chalks


I am adding this card to the following challenges:
1. Christmas Card Club - Star of Wonder
2. Pixies Crafty Workshop - must use snippets.

Saturday 4 June 2016

Making Card Kits From Stash

Thank goodness for my escape to the Langley Stampers Club. I was the host again this month and had great fun designing and kitting up two cards for the members this month.  I will show you one of those cards today and save the other for another post.

My card is a made up with a  pre coloured  image from HobbyCraft.  Some of the club members do not like to colour images, so we all try to design cards that rely on diecuts or pre done images for the main elements. My image is matted with some DCW  turquoise self adhesive textured card. I even remembered to peel off the backing page and use the adhesive backing...usually I forget all about the backing and glue the mat down... teehee

The flowers were made with snippets. I used a Martha Stewart hydrangea punch and then curved each layer for some depth (with a ball edged tool). Added a teensy pearl to the center of each flower. The leaves were cut from snippets of green card, I think I used a Sizzix die.. The background DP was cut from a scrapbook 12x12 page from a pool themed paper pad. I think it was meant to look like pool tiles.


Whenever I make my own card kits for Langley Stampers Club, or for any card kit use, I try to make my kits from what I have on hand. I was making up 11 kits so took 3 pieces of that 12x2 paper and cut each of them into 6x6 squares. My acrylic envelopes are 6x6 so I tucked them in as is, and had each member cut them down to fit the 5 1/2 inch cards I provided. Making up kits is a good way to use up snippets and so with this kit, I have earned the right to play over at Pixies Crafty Workshop!

The yellow banner is a Memory Box  die and I happened to have a teensy acrylic alpha stamp set that just fit for the Happy portion of the sentiment. Birthday was stamped onto yet another snippet of yellow card, and  was accomplished by masking off the Happy portion of the stamp with a bit of tape. I then punched Birthday out with a Stampin" up Word punch.

I finished off this card with a wee dusting of stardust stickles here and there. Just enough to give a little sparkle!

I am entering this card in the following challenges:
1. Pixies Crafty Workshop - must use snippets

Sorry about my crummy photos lately. I seem to have lost my touch to take photos "straight on". Lately, they all are tilted kind of weirdly! Rushing too much, methinks...

Wednesday 1 June 2016

May Rudolph Days Challenge Winner

As always, I used Random Org to select the winner. Here is a photo of the random org winner.


I am pleased to announce that Maarit #31 is our winner. Maarit, could you please email me at Scrappymo1@gmail.com and provide your mailing address so I can get your prize sent off. Let me know whether you would like the stamp or the die.