Sunday 29 September 2013

Holly Jolly Christmas

This is another of the cards I have made to give to kiddies at Christmas. This has certainly been a great way to use up my VOS...especially stash from the dollar store! Some of the elements would make a cardmaker shudder, but a kid would think they were heavenly!
The little square with the cardinal in reverse relief is the last of one huge sheet of 3D chipboard stickers. Can't believe I have managed to use up that whole sheet this year! The red tag with the green brad is from another package of dollar store items...I still have what seems like a zillion of these! They will get used on scrapbook pages and the cards my grandkids like to create.
 Here is a closeup of the bit of sparkle on the tag.
The gorgeous red flourish was sent to me in a RAK from Sandra at Stamping for Pleasure. Pop on over there if you have time. She is currently running her September Rudolph day challenge. It is a great way to get your Christmas cards done and dusted before the busy Christmas season. I added a couple of snowflakes to the flourish...layered two colours for the bottom one and did a little haircut on the green layer! The center gem is a slim one from the dollar store that I am trying out to see if they will make it through the slot at the post office. In this case, I think the brad and the Holly Jolly chipboard are going to fail the slot...but that is OK, as this card will be hand delivered to a good friends little boy!

I managed to use some snippets of paper so will be dropping by Di's playground at Pixies Crafty Workshop. Her challenge is a great way to encourage you to use some snippets from your never ending pile. My kraft snowflake paper and the scrap of wood grain DP, as well as the kraft card stock,  were all from my snippets. Feels good to make something from those scraps!

No recipe tonight as I am a wee bit overtired...had a busy, busy week and have to get up early as DH is driving our eldest daughter (Glamour Girl) to the airport. She is off for 10 weeks in Monaco again:(

I will try to write out the recipe tomorrow. Ten more days of hectic life and then I will settle into our winter routines. I always seem to get more crafting done in the late Fall and winter! I am squeezing in a trip to visit my Mum and my sister, before the icy roads make travelling to the Okanagan difficult. I so do not enjoy winter driving on the Coquihalla Hwy (nicknamed the Highway to Hell)  There is actually a TV show called that, about the tow truck drivers and the rescues they do, on that highway. It is a 4 to 5 hours drive so I will stay there a few days.

I have been keeping up my errand walking on Wednesdays and Thursdays...when I head up to Mum's, I plan to walk into town for her errands. That way, I can still keep to my walking plan. It is a bit further to the shops in her village but that will be good for me. There are 2 benches along the route, so I will just sit for a minute along the way.

I am entering this card in the following challenges:
1. Pixies Crafty Workshop - must use snippets
2. CHNC Extra - must be Christmas


Saturday 28 September 2013

A baby banner and other fun!

Glamour Girl and the Domestic Diva are throwing a baby shower for a girlfriend they have known since High School. Their friend is very much a Glamour Girl too, always impeccably dressed with a great sense of style.

I was asked to make a banner, card, and some photo booth props. My brief was to keep to black, white and hot pink and make sure anything I made looked glamorous. Hopefully I have fulfilled the brief...I did get the colours fairly close, and  managed to throw in some bling.
    
They chose a Parisienne theme, although I am not quite sure why! Their friend was a ballerina and went to school in Britain or maybe even France, where she studied and took dance class daily. That must be the link!

I hope she (and my daughters) like what I have made. During her pregnancy, she has always referred to the baby as "Lil'  Baby Longo" so that is what I used for the banner. It was really hard to take a decent full on photo, as they only place I could lay it out in full was on my dining room table.  Sadly, I couldn't step back far enough to get the whole width in the photo!

I keep the leaves in the table to seat 8 as we do use the dining room quite often.  I do not like to struggle with putting in and taking out a leaf, depending on the number of diners.  We seem to average 8 so I leave the table set up for that all the time. You get to see my not very pristine ironing job! lol  This particular tablecloth puckers when it goes in the dryer...those puckers are a bi*** to get out, let me tell you!


The little sticks with the mustaches and signs on them are props for the photo booth. They have duck feather boas and other props to enhance the fun...lol
This is another NBUS project. I am a bit addicted to the dollar bins at Michaels. Especially so when they put them on clearance for 50 cents or sometimes even less.  I always pick up the chipboard albums as they make great bases for banners. I have two drawers full of them so had to go on a bit of a rummage through, to see what matched up to spell the words! Each album has 4, 5 or 6 chipboard pages depending on which style it is. I found angels, stars, Christmas trees, gingerbread houses, scallops, file tabs and finally...down at the bottom of the second drawer, I found these canvas covered chipboard top note die style albums. I decided to use the matching canvas, chipboard hearts for the "spacers" between the words. Nobody said that shabby chic can't be glamorous too.

I tried a variety of black and white design papers for the background but they were all not quite right.
Then I remembered that I had a pack of back and white damask cupcake papers from the dollar store! I ran upstairs and grabbed them, pressed them flat with the iron (they were so much easier to iron than that tablecloth) and presto, backing paper problem solved. I did not even have to roll them through my Big Shot!

I managed to get the rhinestone Eiffel Towers from another 50 cent sale at Michaels...I thought that was quite a good score and luckily bought every one they had. My daughter are placing some of the extra ones on the glass vases etc on the buffet table.
The black glittered chipboard alphas are from a little Korean store a few blocks from my house. They have the most fun things in there...these did not come with an adhesive backing so I used glue dots but combined them with a few drops of Glossy Accents. Hopefully they stay stuck on!!!

I found some teensy, hot pink ornate frames that were another Michael's 50 cent find. They will be used for the name tags for the buffet table foods. The 3 metal crowns above, were a darker gold colour and I rubbed some silver wax over them to make look a bit more feminine. They will just be tucked in here and there on the buffet table.

In all the rummaging about, I just might be inspired to use the Christmas albums next! I will be haunting the dollar stores to see what fab Christmas designed cupcake liners they bring in this year!

I am entering this banner in the Simon Says Stamp Wednesday Challenge - anything goes. They have a fabulous challenge this week with lots of extra prizes.

Thursday 26 September 2013

September Rudoph Day


Once a month, Sarn at Stamping For Pleasure, runs a Christmas card challenge. It is a great way to boost your finished Crimbo cards.
This year, I am trying to have all my cards made, written out and addressed sometime before mid November. I want to relax and enjoy the Christmas season! Sarn's challenge and some others that I also take part in, keep me on track to meet this personal deadline.

Pop on over and take a peek...the ladies are all a friendly bunch and Sarn will make you feel so welcome.

I stamped my holly image several years ago at a Michael's Make and Take. I think it may have been the first time I used embossing powders. The image and the sentiment are both stamped with versamark and then embossed...hopefully you can see it in the photo.


Although  I love the look of embossing, it is not a technique that I use very often. I am a bit of a neatnik and the loose pieces of powder drive me crazy and make me itch! lol  I tend to emboss at classes or at make and takes like this one. If I emboss at home, I tend to do it outside in the summertime!

I made this so long ago (several years ago at least) that I can not remember the name of the EP. It does have a shimmer of various sparkly colours.
The tag is the remant of  large Basic Grey tag and is from a sheet of various punch out tags. It is so old, I do not have the ID strip anymore. Sorry!

Recipe
Card Base and envelope - from my stash 
DP - My Minds Eye = Winter Wonderland
Card Stock = snippets of green and navy blue
Tag - from my stash (Basic Grey, Pattern unknown)
Pointsettia - K and Co
Brad - red brad from my stash

I am entering this card in the following challenges
1. Stamping for Pleasure Rudolph Day - must be Christmas
2. Pixies Crafty Workshop - must use snippets
3. CHNC Extra - Must be Christmas 
4. CHNC - Challenge 143 Stamp, Stamp, Stamp

Wednesday 25 September 2013

Christmas Card Club - Snowman

Sue J of Olliesmam chose the theme of Snowmen for our Christmas Card Club theme this fortnight.  I am a bit late in posting this one as I was up at the lake and just got home.

I had this laid out on my desk last Wednesday for WOYWW, but ran out of time before we left to get this post organized.  I am now a sea of laundry, ironing and unpacking, but wanted to get this card posted!

This is another very simple card. Another one that uses up some VOS (very old stash) and also manages to use up a couple of blue snippets. Hurrah!
As soon as I read Sue's theme, I remembered I had these two snowmen. I have had these for so long and have been making an effort this year to use up my very old stash. These are from a set of 3D stickers from the dollar store. The larger snowman even has felt mittens!
I cut two blue card stock pieces for the fish tale flag as I did not have a snippet long enough. I cut two pieces of the blue shimmery card stock and seamed them behind the larger of the snowmen.

Here is a close up of the dimension...
Because the paper has a sort of shimmery, pearlescent sheen, the sheen does not match where I had to piece it. I did not have another snippet that had the length running in the same direction. I had to cut the second piece from the width of the paper...resulting in the sheen difference. It reminded me of when I used to sew. Velvet and corduroy had the same sheen problems!

Luckily, once I added the Snowmen, it distracted the eye enough that the sheen difference is not noticeable at a glance. Or so I am telling myself!!! lol

I managed to slide in a tiny K and Co embellishment. Can you find it? Hint...look left...

Recipe
Card base and envelope - from my stash, Michael's Recollections square textured card
DP - My Minds Eye, Christmas
Cardstock - snippets of blue pearlescent card stock
Snowmen and sentiment - from my stash (Dollar store)
Snowflake - tiny silver snowflake in top left corner is K and Co (of course) lol
Bling - red diamond bling from my stash

I am entering this card in the following challenges
1. Christmas Card Club - snowmen
2. Pixies Crafty Workshop - must use snippets
3. CHNC Extra - must be Christmas

Sunday 22 September 2013

Fabric, friends and fun

I am up at the RV and it is the big quilting retreat this weekend. These are the lovely group of ladies who kindly let me sit and make cards beside them when they meet each week to sew and quilt. Once a year, they organize a quilting retreat. The regular Caravans West Quilters, as well as some of their friends from around the province,  meet at the resort each September, to have a weekend of fun and creativity.
The clubhouse might have been a beehive of activity but the front porch was beautifully staged with this lovely array ...so calm and welcoming!
Here is a little closer look of the top of that treadle machine...
But my favourite is this wee machine...
Tucked behind that pillar is this lovely wooden wall hanging.
Here is a photo of the other side of the entrance doors
Inside the hall was a beehive of activity...look at these gorgeous quilts...

Quilts were displayed on every available surface!

Even the pool table was put to use...
The shuffleboard table has been custom fitted as well...
Even the decorative wall shelves have been put to use...
Everywhere you looked there were works of art...
As large as quilts and as small as place mats....every available space had items displayed! Luckily for me, someone had left their measuring tape...I thought it added to the photo...
A few more place mats...
And finally...The warm colours of fall were evident here as well as the approach of a certain time of year...lol

Hope you enjoyed my little tour of the quilt retreat. I think it is quite an amazing event, so well organized by a small group of lovely, creative women!

Thursday 19 September 2013

Not again!

Finally have a card to share.  Just started to make the  recipe list and had to chuckle. I am so predictable...sure enough, there is a K & Co embellishment on my card!  Not again! It seems I use them on almost every Christmas card I make.
My image has been coloured for quite some time. Stamped twice and the wee flower fussy cut for some added double layer dimension. I stickled the leaves and the petals as it seemed too plain. Into the binder it went and has been launguishing in there for several months. Just could not decide how to make it look less plain.
Finally dragged it out and since I had one last acrylic whitewashed painted diecut left over from the butterfly cards, I popped it on there to add the look of a frame.

Here is a bit of a close up...


I have mentioned before that I do not like poinsettias in my house. I always manage to kill them off in no time flat. I have quite a green thumb with other plants...but it is only a matter of time before they start dropping their leaves like mad!

So I have decided the best poinsettia is one that I am giving away! Whether it be a plant, on a card, or even on giftwrap...I like to be giving it away...lol
I chose the sentiment Rejoice as a bit of a pun...Rejoice that this bloom is still alive!

Recipe
Card base - from my stash, Michaels Recollections brand, square corrugated cardboard
DP  - My Minds Eye ( I think), snippet from my stash
Card Stock - snippets of green and kraft,  from my stash
Dies - Spellbinders oval circle; Spellbinders floral Ovals; Quickcutz corner die;
tag
Punch - Martha Stewart snowflake
Embellishment - K and Co Glad Tidings Floral
Bling - pearls from my stash
Jute - snippet from my stash
Sentiment - rubon from my stash

I am entering this card in the following challenges:
1. Pixies Crafty Workshop - must use snippets
2. CHNC Extra - must be Christmas
3. CHNC - Challenge 142, Must be cut out (my poinsettia blossom is fussy cut and layered)

Sunday 15 September 2013

Last of the butterflies

This is the last card from the series of inspirational cards I made up at the lake this summer. These cards were made from a single, small box of supplies. It was fun to see what I could create with those supplies and just how many cards I could make!


I did not have a fine copic liner pen with me ...or any pen for that matter.  Not that we are home, I can not decide whether to draw on some antennae on the butterfly, or leave it as is...
I have left the sentiment blank. Once I know what I will use this card for (birthday, get well, hello, etc) then I will add an appropriate sentiment inside. I may even draw some antennae on at that time!

Here is a close up of the focal point. I kept it very simple...just a few diamonds scattered here and there on the DP and of course a row down the center of the chipboard butterfly.
Recipe
Card Base -  from my stash, Michaels Recollections brand square white textured card & envelope
DP - Prima Lyric
Cardstock - Kraft snippet from my stash
Chipboard - butterfly from my stash, bargain bins at Michaels 
Bling - from my stash
Paint - ivory acrylic paint

I am entering this card in the following challenges
1. Pixies Crafty Workshop - must use snippets
2. Sparkles - Fairies or butterflies

Friday 13 September 2013

Is your Dad picking you up?

No card today...just a sweet little story. Well, it might not seem so sweet to Mr Scrappymo!

I picked up Little Mr P from kindergarten last week. His class was doing graduated entry so he was done about an hour before Little Miss C.
As we were walking home together, he asked me if my Dad was picking me up. I replied that Grandpa was picking me up. He said that is who he meant! I gently told him that Grandpa is my husband, not my Dad.

He looked a little perplexed for a moment and then asked "If he is your husband...how come he has grey hair"    lol

Thank goodness for my hair colour...that is all I can say!


Thursday 12 September 2013

Another Chocolate Bar Card

Finished up another Kids Christmas Card. The corrugated card base is folded twice at the top, creating a bit of extra depth...just right for sliding a chocolate bar or an envelope of Hot Chocolate inside.
This will go to a little boy, maybe even the little boy next door. I made his sister's already...it was the blue mug of hot chocolate card I posted in August. This one has a decidedly masculine feel so should be just right for this little guy.

I know you all must be surprised to see ribbon on this card. I rarely use ribbon myself although I do love it on others cards. Mostly because I never remember to put it on until it is too late! I like to wrap the edges under something to anchor them. That takes planning...lol


So my new thing is to try and include a piece of of ribbon when I choose the bits and bobs to create my card. Hopefully this new process will help me to remember to use it! I do have a lot of ribbon and brought even more back from England. So expect to see ribbon in use here!

This card went together easily. It uses up more dollar store chipboard elements that I have had for a few years. I am trying to use up some of those items that perhaps a cardmaker would not love to see on her card...but a kid would love! The bigger the better...right? I even managed to use up another of the teensy kraft flowers...Bonus!
 I also roughed up the edges of the DP on this card, to give it a bit of a rugged look. Kind of in keeping for a masculine card.

Recipe
Card base - square corrugated card and envelope, from my stash (Michael's Recollections)
Cardstock - snippets of dark green and kraft from my stash
DP - MME
Dies - Quickcuts corner die
Punch - Martha Stewart snowflake and Martha branch
Poinsettia - from my stash, Scrapbook Sally poinsettias
Ribbon - from my stash (eons old) maker unknown
Bling - red pearls from my stash
Brad - red brad from my stash

I am entering this card in the following challenges
1. Pixies Crafty Workshop - must use snippets
2. CHNC Extra - must be Christmas
3. MFP Speedy TV Christmas Card Club - must be Christmas
4. Sister Act - always anything goes
5. CHNC -  Challenge 141, Layer it up
6. The Glory Of Christmas - Anything Goes # 15

Tuesday 10 September 2013

WOYWW # 223 - Getting back into the swing of things

Now that we are home again, I am trying to re-establish routines. Routines to get our lives back on an even keel. Routines to accommodate grandkids, kids, family time, friends, housework, the garden work and crafting. Especially crafting!

The pace of life here in the Lower Mainland can be crazy at times. Lineups for everything, circling for a parking space, traffic jams...uggggh! A far cry from our Filey days where we walked everywhere in town...even down to the beach. I am trying to find a way to simplify our routines here. While we can not walk everywhere here, I think I have thought of some ways to incorporate walking into our weekly life.

On the 2 days per week that we walk the grandkids to school, I hope to get our errands done before the grandkids need walked back home. Most of the time, my SIL is home to pick them up,  but if I make those two days my shopping, library, grocery, drugstore days, then I am still in the area to pick them back up if he is kept late at work. Since all those places are within walking distance (within a mile) of my daughters house, those will be our walking days!

My plan is to then have 2 days to just stay home...not leave the house at all...and hopefully get some crafting done. Of course the dreaded housework and garden work still need done, but there are 3 other days each week!

So keeping my new plan in place, here is my desk this week. Three cards finished and several more laid out and ready to start. So far so good! To boost my resolve, I have been making fairly easy cards...I am easing gently into taking on a stamped and coloured image card...but if all goes well, I should have that to show you next Wednesday!

A bit of a closeup...


Now I would like to ask you a favour. Some of my followers have been having trouble accessing my blog. They are getting a 503 error code when they try to comment or to gmail me. This is a blogger problem that has occurred for the past few months since blogger made some country code changes. Many Blogger blogs are having this problem and the bloggers are not even aware of why their comments have dropped somewhat. I only know because one of my bloggy friends has both of my email addresses. She is getting a 503 error code on my blog and let me know through my regular email. I am trying to figure out how big this problem for me, so if you are not able to comment on my blog, could you drop me an email at...
maureenkane@telus.net   You can keep it even shorter than the average comment! Just three word... Getting error code...and I will know what it means!

Solving the problem means redesigning the way my blog posts read...switching to single post views rather than a scrolling type format. I would prefer not to change that, so knowing how many commenters are affected would help me make a decision. Thanks so much for taking the time to email.

If you are wondering why I am showing your my desktop, drop by Julia at the Stamping Ground for an explanation and a chance to peek at all the other work desks around the world!

Sunday 8 September 2013

Christmas Card Club - Monochrome

It is time once again to post my card for the Christmas Card Club.

Clare chose the theme and it is Monochrome.  It was harder than I thought, but I liked challenging myself with this theme. I thought I had a lot of papers this pinky. reddish, brick colour, but when I pulled them and laid them out, it was apparent some were too ivory looking. I stamped my image on white paper so those ivory papers looked glaringly wrong!

In the end I opted for the easy solution and just used one DP and combined with a printed ribbon. It fits the brief and I do like the DP I chose. I added the K & Co baubles to perk it up a little and since the ribbon and the image both say Merry and Bright, I decided to forgo a sentiment stamp.

Although it does not show, I did add some stardust Stickles to Santa and the stamped snowflakes on the image. I am not great at stamping, as you can see...my solid type stamps always seem to stamp off a little blotchy...I am trying to convince myself that it makes it look more handmade!!! lol

After it was all finished and I was about to take the photo this morning, I decided it was too plain. I added some layered MS snowflakes to sort of look like an easel frame around the image. Then I may have gone a step too far and added one more sort of nestled alongside the baubles. Think I may play with that one a bit more as I am not sure that I like the exact placement. I may even remove it...hmmn...what do you think...
Recipe
Card Base - White square card and envelope from my stash
DP - 12 x12 snippet left over from a scrapbook project, Echo Park, Style Essentials
Cardstock - snippet of red cardstock from my stash
Stamp - from a class at my LSS, manufacturer unknown
Die - Spellbinders deckle rectangle and Sizzix corner
Embellishments - K & Co baubles
Ribbon - snippet of preprinted Merry and Bright ribbon from my stash
Bling - from my stash ( Dollarama originally)
Stickles - Stardust

I am entering this card in the following challenges
1. Pixies Crafty Workshop - must use snippets
2. Christmas Card Club - monochrome
3. CHNC Extra - must be Christmas
4. CHNC - layer it up
5. MFP Speedy TV Christmas Card Club - must be Christmas

Friday 6 September 2013

Resurfacing

Well, it's been a week since we stepped off the plane and we are both fully stuck fighting jet lag! We have never had it this long and we are both completely fed up with it.
We have been keeping busy with the kids, grandkids, family dinners, catching up in the garden and of course dealing with the mountain of laundry and ironing! We do feel truly home, but are still falling asleep watching TV right after supper and then waking up at silly o'clock!

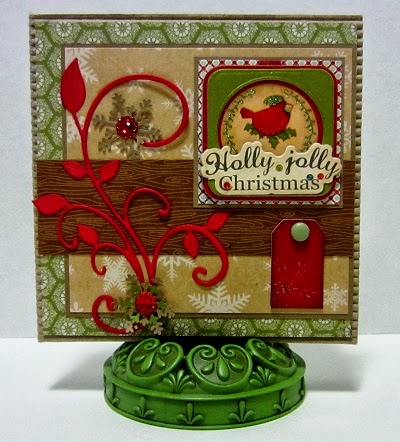
I did manage to make a card while catching up the laundry. My laundry room is right beside my craft room so I am usually more productive when I have a mountain of laundry!  lol
This is a fairly simple Christmas card but keep in mind I could have fallen asleep at any point when making it...
I used a piece of green cardstock in between the DP and the red mirri card. It matched the dull sort of green on the bottom edge of the bird sticker. Once the card was finished, I knew it was too insipid. I dug out some stickles and carefully painted it on the slim frame of that green cardstock. I used a mixture of 2 shades of green stickles and finally some Stardust. It seems to stand out a bit more now but is certainly hard to photograph!
I did two layers of the Spellbinders Fancy Tag 2. The bottom layer has been painted with cream paint...yes...a leftover painted edge tag from my August cards...Waste not, Want not, I say!

Recipe
Kraft scalloped card base - cut at my LSS on their Accucut system
Red mirri card = American Crafts snippet from my stash
Green glitter card - snippet of cardstock from my stash that I covered with green stickles
DP - red flocked brocade, snippet from my stash, originally from the dollar store
Dies - Spellbinders Fancy Tags 2
Sticker - red foiled edge script sticker from my stash, source unknown
3D Sticker - K and Co oval bird sticker
Bling - from my stash
Stickles - Stardust, and two shades of green mixed together.

I am entering this card is in the following challenges
1. Pixies Crafty Workshop - must use snippets
2. CHNC Extra - must be Christmas
3. Marks Finest Papers, Speedy TV Christmas Card Club - must be Christmas
4. Sister Act Card Challenge - anything goes
Finally ready to start sharing some of my trip photos...
Here are some of the lovely gifts I received when I met up with some of my bloggy friends IRL.

This is the gorgeous Welsh wooden spoon (and handmade gift bag) I received from Sam at Hettiecraft . The carved spoons are a centuries old, Welsh tradition. It was so nice to receive something so unique to Welsh culture.
I will always treasure this!  Sam drove for hours from Wales just to meet me and then drove again to Flutterby's craft shop where we had some crafty fun.
She even did without a proper lunch so we could get over to our afternoon outing. What a trooper! Hope you will check out her blog as she is a really talented lady!  She is very versatile...from Tim Holtz grungy style, to vintage, to pretty...she does them all so well.
 
Di from Pixies Crafty Workshop drove over as well and formed the key element to our trio!

 I say key element, as Di lives in the area and was our SatNav to Flutterby's. lol

 Di runs a weekly challenge to encourage you to use up your scraps or snippets! Pop on over to visit...Di is funny, very talented and so supportive and kind. She made me the sweetest card and an assortment of magnet bookmarks...many have already been claimed by my family members! Here are the sweet bookmarks I have left...can you guess where we went in the afternoon???


Yep...here we are...Mr Scrappymo, Sam and Di walking just ahead of me...all eyes on Highclere! Looks like DH is taking a photo too.


 Di remembered that I once posted how pricey charms are in Canada and how they are impossible to find in any of the big chain stores or even on the fairly large LSS's in my area...so she surprised me with an assortment of charms.


When I was in Filey, I took the train into Scarborough and met up with Sue J of Olliesmam and her lovely husband Paul. It was such a joy to meet them as Sue and I have been chatting both through comments and emails. Sue also remembered I was looking forward to getting some charms in England and she brought me a fabulous assortment of charms as well. I hope you will check out her blog as Sue, Ollie and Paul are fun to follow. Sue does gorgeous colouring!
I am on the left, Sue P in the middle and Sue J on the left. They met me at the train station in Scarborough.

I mixed Di's and Sue's charms all together in a lovely little chiffon bag to stow them more easily in my suitcase...not stopping to think about photo taking later. So this total, gorgeous assortment I have been showing you is actually from Sue J and Di. Of course I think Ollie had a say in which pretty charms I received! After all, there are some wee doggies and even a bone!  Here are a few more of this shared present!
Sue P of  Planet Susie and her lovely husband Graham joined us in Scarborough. They drove up and stayed in a hotel in Scarborough for a couple of nights. I was really touched that my bloggy friends (and their lovely husbands) drove so far and took time out of their busy schedules to meet with me! 
I was truly blessed! Here we are having Fish and Chips at Winking Willy's...I swear I did not make up the name. Left to right: Me, Sue J, Sue P and then her husband Graham and rounding out the group Paul J.

We all headed up to Alonzi's Harbour Bar for an ice cream...it would not be a day at the seaside without ice cream. Alonzi's has been serving fabulous icecream there for over 45 years.


Sue P surprised me with these gorgeous stick pins. They are superbly made...she brought a set for Sue J as well...we were lucky ladies! If you check out her blog you will see that not only is she talented, she is really funny too!
Here is a closeup of these beauties...
Sue P. even made the beautiful presentation boxes!